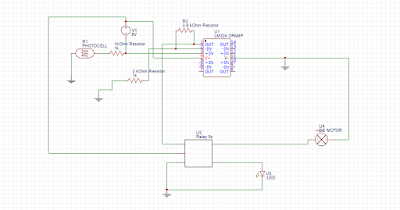
1. Provide the computer drawing for your individual RG setup.
2. Explain your setup.
-The circuit begins with a 5V source connected to one end of a photocell and a ground source connected to the other pin of the photocell. The photocell is then connected to pin 3 of the Opamp. A ground source connected through a 3kOhm resistor is then connected to pin 2, this same source is also connected to pin 1 through a 3.9kOhm resistor. A voltage source of 5V is connected to pin 4 of the Opamp. Pin 1 of the Opamp which is the output is connected to pin 2 of the relay. A voltage source is connected to pin 1 of the relay and a ground source to pin 5. The DC motor is connected to pin 3 and an LED light is connected to pin 4. The circuit begins with the LED turned on, since all the voltage going through the relay is coming out at pin 4. When a light source is applied to the photocell, the voltage should drop below 2V which will switch it to pin 4 and make the DC motor go off, therefore starting the Rube Goldberg.
3. Provide photos of the circuit and setup.
Picture 1 of Circuit
Picture 1 of RG
Picture 2 of RG
4. Provide at least 2 videos of your setup in action (parts or whole), at least one being a failed attempt.
Rube Goldberg Fail
Rube Goldberg
5. What failures did you have? How did you overcome them?
-A big problem I encountered while making this circuit was being able to find the necessary voltage required to make the relay work. The photocell wasn't working properly at the beginning, but once it was replaced for a new one it started working perfectly. Another problem was utilizing the circuit to make the ball move in the mechanical part of the project. Since the ball started at such a high elevation, it was a struggle trying to make the ball move without knocking down the entire platform but after a while of moving everything and organizing it, I managed to make the project work.


Glad you made the project work! I like how you were able to use less wires on your electrical side, my breadboard seems to have too many wires on it. But the mechanical side looks to have very good reliablity.
ReplyDeleteNice circuit Schematic, what program did you use to draw that? My question I guess is how you plan on triggering the photocell (obviously with light, but what sort of light source) from a previous person's circuit? The initial description of your Non-inverting op-amp was confusing. Don't forget to finish explaining your setup in #1. I'm not sure if the circuit works correctly because there currently aren't any videos posted yet, but i'm excited to see it on Wednesday.
ReplyDeleteAngel, I am interested to see how applying a light source to a photoresistor will work in practice;I found that I was only able to get a consistent result by starting with no light at all and then using the light from the room. Your mechanical component looks really good; it seems like you overcame some major issues with the stability of the set-up.
ReplyDeleteAngel, very nice job and nice design. Your circuit setup is clear, but how do you think you project ending will help the next person?
ReplyDeleteCan you tell me please which software for question number 1.